|
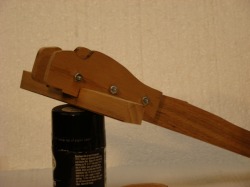
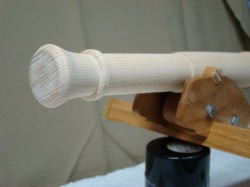
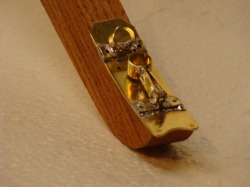
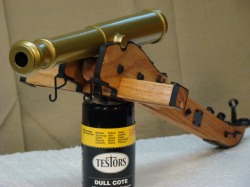
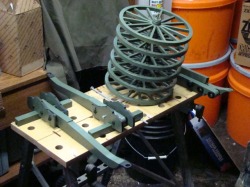
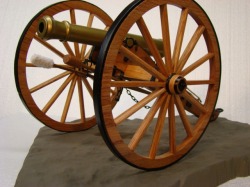
Tonight we are going to head to the Civil War and talk about the cannons of Fubar IV. If you have been around here for a while, you have already seen the Update on his fabulous ACW Battle Forge. Tonight we are going to look at some of his great cannons. When you see a scene like this, it is almost hard to believe that it is 1:6th just due to the scope of what you are seeing. These cannon are simply amazing.  It starts with pieces of wood, which are carefully crafted to the correct size and shape from precise drawings. Fubar has always been very skilled at woodworking. It is only logical that when he applied those skills towards building scale cannon that the result would be museum quality masterpieces.  The carriage is made up of four pieces of wood and this is what it looks like before any of the detail goes into it. Even at this point it is easy to see the accuracy of the parts.  Fubar turned each of his cannon barrels on the lathe. Over time he has made several different kinds of barrels, all of which are styled after Civil War cannons. This one pictured is one of my particular favorites.  A variety of materials were used to create the details on Fubar's cannons. Brass and styrene are the two most used materials. This working support made from brass is really sharp looking work.  Fubar's first cannon was left in it's natural wood, rather than being painted to show off the beauty of the wood. Here you see it before the wheels were added. All of the added details have been painted black and the cannon barrel itself brass.  Of course what scares most folks about a project like this are the wheels. After making his first cannon with wood rims, Fubar hit on the idea of making his wheel rims by cutting PCV pipe of the proper diameter into thin slices to make nice solid sturdy wheels. He then adds the hub and spokes from wood.  The result is a beautiful looking field piece that can also stand up to backyard use. This is that original cannon as it was finally completed. It's okay to drool. As a matter of fact, here are a couple more pictures to drool over. I really love this natural wood finished field piece, it reminds me of the models I saw in the Smithsonian as a kid, but for shots in the field, he has a complete battery done in green. Add to that his limbers and Battle Forge and you have an amazing slice of Civil War artillery. Well, that's all for tonight Campers, hope you enjoyed this "Blast from the Past". Until next time, have a good one!
3 Comments
I wanted to feature my good friend CK2 this evening and give you a personal invitation to check out his website; CHECKMATEKING2's KINGDOM I've known CK2 for a lot of years and yes, I still like him (ha-ha). Truthfully, he's one of those folk that would give you the shirt of his back. So, tonight in honor of his new website, I would like to share some of my favorite CK2 photos, but these all fall within a specific theme. Tonight, we are doing the Union Army. These two shots above really demonstrate his ability to get in and get the shot that tells an interesting story. Even without bullets flying, it still has a feeling of tension about it. 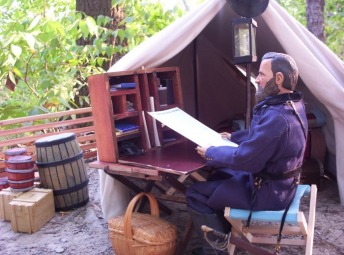 These next four pics are from CK2's Vicksburg shoot. I love that Side Show Grant in front of CK2's scratchbuilt tent. What a great looking diorama. 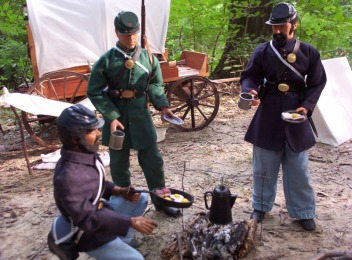 Here the boys are cooking up a little breakfast before moving out. That beautiful CK2 scratchbuilt wagon makes the perfect backdrop for this little scene. Here we are, ..."once more unto the breach"... Union boys have got the stone wall this time and something tells me that there aren't any southern boys that will be taking this line. (by the way, for all you that have at one time or another questioned my breeding, that quote is Shakespeare, King Henry the fifth) So congratulations old buddy on a great looking website. It came out real nice. You all hit on the link above and go take a look. You won't be disappointed. Until next time, have a good one.
Without a doubt my favorite 1:6th Horse is the Marx Horse. I am not alone in this opinion, I know that CK2, Fubar IV and Okimbored would all agree with me. For the money, Thunderbolt has the best detail and the size seems to be just about perfect for most 1:6th figures. In comparison the DID horse looks like a Chia Pet and the Dragon horse looks like a very large draft animal. There was more than one version of the Marx horse, but a couple stand out in my mind; the tradition Thunderbolt (seen above) and what I call “the bobble-head horse” (seen below). This was actually a pretty cool design for the time as it allowed some interesting poses of the head. I have only been able to get my hands on one of these so far. As I began to do Civil War and Western figures, I began to realize that I would need some saddles and tack for my herd. Best of the West saddles wouldn’t cut it for Civil War and besides there weren’t enough of them to go around anyway. I began to do a little searching online and found a place that made a large variety of custom saddles; www.benscustomtack.com As you can see from the picture above, there is no doubt that Ben does some beautiful work, but he also charges a fairly hefty price and I knew I would never be able to afford the quantity of saddles that I required if I had to buy custom pieces. I determined that I could probably make a pattern based on Ben’s confederate saddle design shown above and make my own custom saddles. Actually, what I initially drew out was pretty close to the pattern I actually used to make my saddles. I found some suitable leather and picked up some leather glue at Tandy Leather and began the process of putting together my first saddle. It was time consuming, but actually much easier than I thought it would be. Once I knew that it would work, I began to pass out the pattern to others with a similar interest. Fubar IV especially got into saddle making and quickly began to experiment with the basic pattern, changing it just slightly to make an all leather McClellan saddle. Yes, I know, a McClellan isn’t all leather, but you can fake a McClellan without actually having to have a saddle tree. Take a look at what Fubar has done and I would think you would agree that it looks pretty good. Here is another saddle that Fubar IV put together based on the original pattern, It looks real sharp. He found a way of stamping out the little brass fitting in the back of the seat and I have got to tell you, they add tremendously to the saddle. I have them on all my saddles now and it really makes them look sharp. Below is an instruction sheet that I put together to send with the pattern when people asked for it. It is not to scale, but it gives you a really good idea of the various parts and the steps required. Anyone who is interested can get more info from me through this website. As we perfected the design, we began to make additions such as rifle scabbards and working saddle bags, etc. Rio Rondo sells two or three different 1:6th bits, but I just copied one of their designs and made my own bits out of styrene and brass. You have to be careful with them, but they look about as good as theirs and the don’t cost anything. I told you all before that I am cheap. Well, that is it for Horses and Saddles at this time. Hope it has provided some useful information for someone. Until next time, have a good one!
Handmade out of wood that CK2 was able to scrounge up from here and there, this is a beautiful 1:6th model of an Old West Wagon. CK2 has a great practical approach to modeling that allows his to modify vehicles so that they can serve more than one purpose. This wagon is no exception, it can be used as a covered wagon, a buckboard or a chuckwagon. He has created a pantry module that slides in and out of the back of the wagon to create the chuckwagon version. 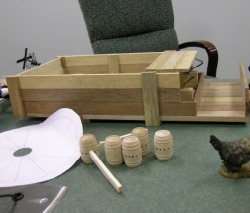 The construction of the wagon is pretty straightforward. CK2 decided on a length and width and then cut his wood scraps to the appropriate size for creating the bed, sides and supports. I forget what he told me used for the stays that form the frame for the cover, but they are removeable to create the buckboard look. 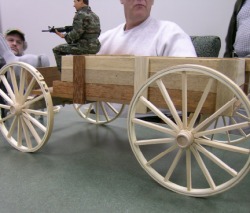 The wheels are the most difficult part of the project. The rims are made from embroidery hoops and a little preformed barrel piece is used as the hub. It is pretty hard to get everything all lined up properly, but as you can see CK2 has mastered the skill of making great looking wagon wheels. Notice that there are two different sizes. 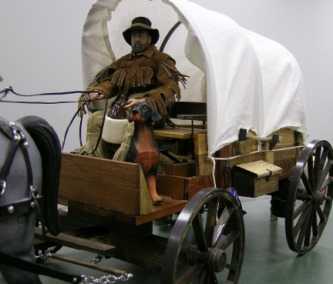 There are some great details on the wagon, like the seat for example, which has real metal springs. Notice also the tool box with latch and the ax above it. I particularly like the chuckwagon pantry insert. This thing is really cool and CK 2 has got some great detail items for his trail cook to make supper with (where are the Bush’s Beans?). Below, we get a shot of the wagon being used as a supply wagon by some Union troops in a realistic setting. I am telling you, this piece can really add a ton of interest to a diorama, whether it is a Civil War scene like this or a Western scene. I do need to get busy and make me one of these.
Great job CK2! During the Civil War, a traveling forge was specifically designed and constructed as a blacksmith shop on wheels to carry the essential equipment necessary for blacksmiths and artisans to both shoe horses and repair wagons and artillery equipment for both U.S. and Confederate armies during the American Civil War. An American Civil War era traveling forge contained 1200 pound of tools, coal and supplies. These tools and supplies included a bellows attached to a fireplace, a four-inch wide vise, 100 pound anvil, a box containing 250 pounds of coal, 200 pounds of horse shoes, four foot long bundled bars of iron, and on the limber was a box containing the smith’s hand tools. - Wikipedia, ©2009 Fubar IV’s traveling battle forge is a truly marvelous model, pictures don’t do it justice. When you see this piece in combination with his limber and cannon battery, it literally “blows you away” (pun intended). The forge is an exacting miniature replica of the forges used by both armies during the civil war and features miniature tools and a operating bellows handle. Construction is similar to his cannon and limber models with wood, styrene and brass components being the majority of materials used. His wagon wheels use a superior technique to most of the homemade wagon wheels out there as his rims are made of a single piece of PVC cut in scale widths on a table saw. The wooden spoke are then pinned to the rim and the hub making for a very durable, functional wheel. The frame and box of the forge are made of wood and are accurately detailed with fittings made from styrene and brass. When I saw the model up close I was convinced that all of the parts were actually metal. It is beautiful work. Fubar has included a selections of tools. There is a vise mounted onto the frame of the forge and a anvil with miniature hammers. The vise and anvil are made of wood, but you would swear that they are cast iron because of the realistic painting. I won’t even begin to describe how Fubar has created a spring loaded bellows handle. All I can say was that I was very surprised when he removed the top of the forge to show me the mechanism. Speaking of that top, it is made of a piece of card stock, covered with thin copper sheet that you can buy at better hobby shops. It looks just like the real thing. On the back of the forge there is a tool/supply box with a hinged lid. Fubar plans to fill it with horseshoes eventually. 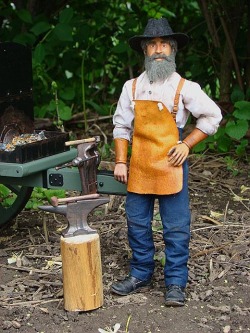 The final piece of the model is a beautifully done blacksmith with real hair (faux fur) and real leather boots and apron. I particularly like the leather forearm protectors; a very realistic detail that adds greatly to the final appearance of the figure. All of Fubar’s figures get facial repaints with pastels. He does a really nice job of creating subtle life-like shading (most of my facial repaints end up looking like raccoons). He finishes off the repaint with a layer of dullcoat to protect his work. I don’t know about you guys, but I would love to have one of these setups for my 6th Georgia. This is one sweet piece and as you can see makes for a great diorama all by itself, imagine it with a battery of cannon and limbers. I'll take three thank you, Well, that's all for this time, Until next time, have a good one! |
SSCC
|