SSCC Ohio
  • HOME
  • ABOUT THE SSCC
  • CONTACT THE SSCC
  • 2011 FT THOMAS Newspaper articles
  • 2012 FACES of FT. THOMAS
  • WACO MILITARY EXPERIENCE
  • INVASION - AN SSCC DIORAMA
  • Battle of France Teaser - An SSCC Mini Dio
  • BATTLE OF FRANCE - An SSCC DIORAMA
  • The SSCC's Approved Vendor's List
  • MARINE Museum Review
  • SSCC DISPATCHES NEWSLETTER ARCHIVE
  • THE OLD BLOG ARCHIVES
  • OLD BLOG ARCHIEVES p. 2
  • OLD BLOG ARCHIVES P.3

STAR TREK - ARTWORK

8/25/2010

1 Comment

 
Quite a while ago I talked about the process of building a Starship Bridge for my Star Trek - First Generation series. Next, I covered the process of creating a special effect like "beaming down". Tonight, I would like to continue along the same vein with a look at the artwork that completed that bridge that I first talked about.
Picture
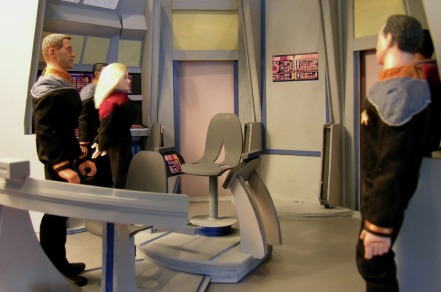
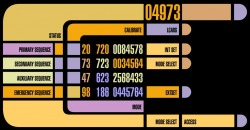
The bridge of my USS Bunker Hill is admittedly, a pretty cool set, but what really makes it special is the artwork panels that appear at all the various crew stations.
Picture
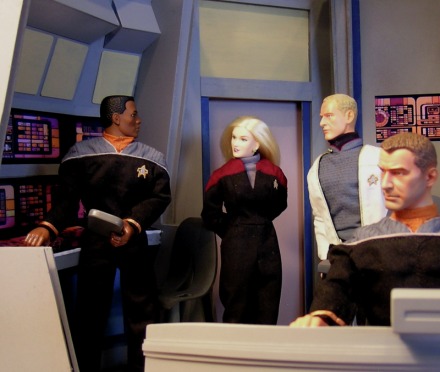
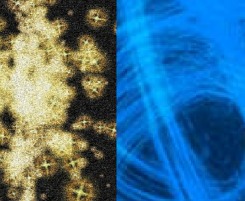
Without that artwork, there really wouldn't be anything about the bridge to catch the viewer's eye. Those colorful panels that we have seen on the Next Generation, Deep Space Nine and Voyager, well... they are what make the starship set believable.
Picture
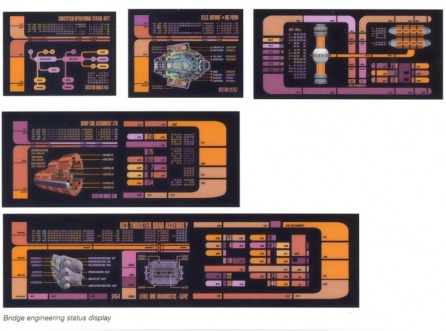
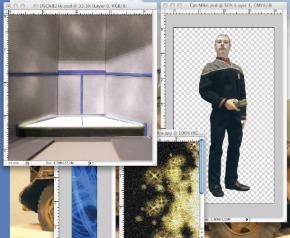
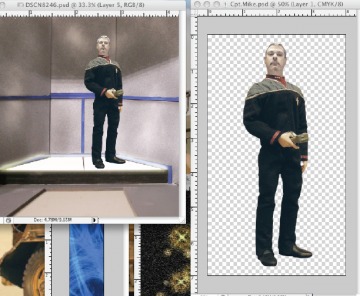
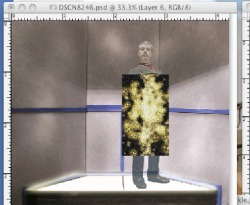
The ones I use on my set are highly detailed, they go together and they all came from a single source. Years ago, I picked up a Trekie "Manual" for the Deep Space Nine series. In that book were beautiful color plates of pretty much all of the control surfaces on the USS Defiant bridge. When I decided that I wanted to do a 1:6th Star Trek series and that I was going to build a scaled down version of the Defiant bridge, I had all the art at my fingertips.
Picture
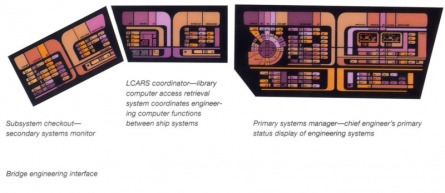
It was just a matter of scanning it and scaling it down to the size of my model. I printed the final artwork on gloss photo paper so that I would have the sort of shiny "glass-like" surfaces that you see in the TV shows.
Picture
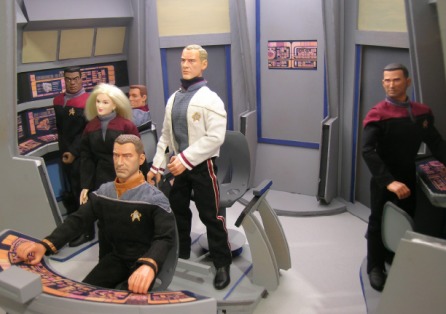
The effect worked far better than I ever imagined and the end result was a pretty realistic looking environment for my 1:6th actors to work in.
Picture
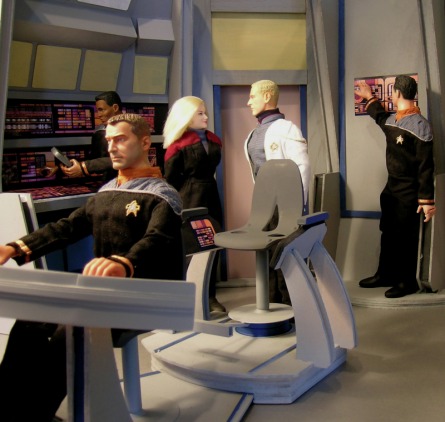
And it has held up pretty good over time, which is rather amazing considering that it came to Ohio in the back of the car and my first episode was shot on the dining room table of a temporary apartment the first month I was here. I think the Bunker Hill still has quite a few Voyages in her... going where no 1:6th Action Figure has gone before.


Until next time, have a good one!
1 Comment

SPECIAL EFFECTS, or how to transport in 1:6th Scale

7/19/2010

2 Comments


STAR TREK - THE FIRST GENERATION

Picture
Crew of the Bunker Hill boldly going where no man has gone before.
Picture
Hey Troopers, Point Man here. You know, the thing about Star Trek is that it gets a little old if all your Starfleet guys ever do is sit on the bridge. There is this little thing called AWAY MISSIONS, and you need to have them fairly regularly if you want to keep it interesting. That is going to require a shuttle pod or "beaming down" to the surface of the planet you want to explore. It is definitely cheaper to beam down, but that is going to require a little thing called SPECIAL EFFECTS.

Picture
"Two to beam down Scotty." Beaming requires some sort of photo manipulation software (preferably one that uses layers) and it requires some SPARKLES and SWIRLS (like these).
Picture
I forget where I got these from, but if you want to try your own transporter effect, I will be glad to send them your way. The sparkles represent the breakdown of matter into an energy stream and the blue swirly stuff is the confinement beam that you always saw on the original Star Trek series. (By the way, does anyone know how that original confinement beam was created for the original series?)

Picture
Once you have your raw materials you are ready to get started. I am working in Photoshop for this effect. I start with a picture of the "transporter set" that I made out of wood and a picture of Captain Point Man. The picture of me has been "clipped". In other words we have created a hard line around the edge of the image with a pen tool that will allow us to lift only that image out of the page and place it in another image.

Picture

Here we have actually "drag and dropped" Captain Point Man onto the transporter picture. Beats using the turbo lift.

Picture
Next we drag our Sparkles image into the photo. It must first be resized so that it completely covers the figure. Then we can erase the parts that we do not want to keep (everything NOT on the figure) using an eraser tool with a soft feathered edge. I usually use the opacity tool to make this easier . When completed we can then use the opacity tool on both the sparkles and the figure to achieve a look of the transportation process. The result looks a lot like the picture below.

Picture
Picture
Finally, we add the image of the confinement beam and once again use the opacity tool to achieve a "see-through" effect. And hey, we are on our way.

Now you may be wondering why I decided to torture you with this feature on Special Effects tonight. Well, it is really pretty simple, The Email UPDATE tomorrow is going to be on STAR TREK and I felt like doing a related subject tonight. If you have questions about this effect and others, or about Photoshop in general, feel free to ask. I am always happy to share what I have learned about this great program; it's not a lot, but you don't have to know a ton to have fun with it.

That's it for this evening, until next time, have a good one!
2 Comments
    Picture

    SSCC 
    DAILY UPDATE 

    The SSCC DAILY UPDATE is for the members of the SSCC, but we don't have a bunch of passwords and stuff on here. If you are visiting our site, we welcome you to read the updates and respond with comments, questions, etc. We ask only that you keep it clean. - Thanks, the Management

    Archives

    February 2011
    January 2011
    December 2010
    November 2010
    October 2010
    September 2010
    August 2010
    July 2010

    Categories

    All
    2010 Show
    Artillery
    Artwork
    Authenticity
    Batman
    Battle Of The Bulge
    Boat
    British
    Cannon
    Cavalry
    Civil War
    Ck2
    Custom Figure
    Dick Winters
    Diorama
    Dioramas
    Display
    Displays
    Dragon
    Dr. Zorkon
    Figures
    Flat Boat
    Ft. Thomas
    German
    Gi Joe
    Haunted M5
    Haunted Tank
    Horse
    Horses
    Indian
    Italian
    Jeep
    Junction
    Kitchen Wagon
    Lunken
    Meeting Night
    Modeling
    Modern
    Morris
    Mountain Man
    Old West
    Panzer Ii
    Pbr
    Printables
    Prospector
    Rat Patrol
    Reenacting
    Review
    Saddles
    Sas Desert Jeep
    Scifi
    Sci-Fi
    Sculpts
    Sgt Rock
    Show
    Shows
    Special Effects
    Speculation
    Star Trek
    Star Wars
    Stormtroopers
    Stuart Tank
    Tank
    Tc
    Time Wars
    Union
    Vietnam
    Wagon
    Web Site Updates
    Western
    Wwii
    WWII Sd.kfz 222

    RSS Feed

Powered by Create your own unique website with customizable templates.